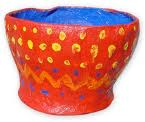
Paper Mache is one of the most versatile and fun crafts around!
There is no right or wrong way to do it, (there isn’t even a right or wrong way to spell it – Paper Mache, Papier Mache?!)
Using paper mache you can create almost anything, and the best part is, you probably have everything you need to create paper mache masterpieces laying around your home right now!
To make the glue (to use with shredded newspaper)
You will need:
•Water
•Flour
How to:
To make paper mache paste, simply mix together 1 part flour to 2 parts water.
*You will want it to be the consistency of a thick glue. (Add more water or flour as necessary, mixing well to remove any lumps.)
If you don’t like the smell of the glue mixture you can add a few sprinkles of cinnamon or vanilla to sweeten it up!
You can store the ‘glue’ in a covered bowl or jar, in the refrigerator, for a few days.
What can I make?
You can make whatever you want to with paper mache, but you’ll need to have something to model around such as wire or a balloon.
Here is a simple paper mache craft activity for paper mache beginners!
Paper mache bowl
You will need:
*Shredded newspaper
*Paper mache glue
* Balloon
* Vaseline
*Paints, sequins, materials to decorate
 How to:
*Tear up thin strips of paper. Follow the grain of the paper if you can. The thinner that you can make the strips, the better. It is recommended that you aim for strips that are about 2-3cm (.78″ x 1.1″) wide.
*Select a suitable mould. Beginners are best starting off with a typical bowl shape. For the more advanced, you may like to vary the shape according to your imagination.
*Cover the mould in Vaseline. Be sure to cover it thickly. This is important because it helps to get your project off the mould. If you don’t have enough covering the mould, the project may break as you try to remove it.
*Dip a strip of paper into the glue and wipe off the excess paste – whilst it should be covered in paste, do not have it dripping.
*Place the strip onto the mould and smooth it out. Repeat with each strip until the bowl is entirely covered with a single layer.
*Leave the first layer to dry for an hour or two. After the mould is completely covered, prepare a second layer.
*Leave the double layered project overnight to dry. This will allow the base of the bowl to harden thoroughly. Keep in a warm, dry spot.
*Decorate!


